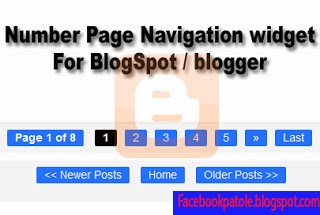
Many blogspot user/bloggers are finding on Google, bing, yahoo or any other search engine about page navigation widget. But they do not find the any solution or they will see many page navigation widgets are not work. For blogger / Blogspot users this page navigation widget developed and converted by MBT. If you are implementing carefully and use this widget on your blgo then you will show it in your blog and also its working perfect. After adding This Page navigation widget helps your readers to jump from one page to another page or specific page which they want. It has a small button at bottom by which any visitors can go directly on last page. We use some CSS effects in this awesome page navigation widget. Like Css hover effect. Even I am also using this widget for my blog you can see this at last of my blog.
Follow these simple steps to add this Number Page Navigation
You can add this widget in just three steps.
Step 1
- Go to Blogger Dashboard
- Click on DropDown Menu and select Template
- Backup your Template before making any changes to your blog
- Now Click on Edit HTML --> Proceed -->Expand Widget Templates
- Press Ctrl + F and search the code shown below
- Paste below code before the above line.
<b:includable id='mobile-index-post' var='post'>
Paste below code before the above line.
<b:includable id='page-navi'>
<div class='pagenavi'>
<script type='text/javascript'>
var pageNaviConf = {
perPage: 7,numPages: 5,firstText: "First",
lastText: "Last",
nextText: "»",
prevText: "«"
}
</script>
<script type="text/javascript" src="http://yourjavascript.com/815315225/www.mybloggerblog.com.js"></script><div class='clear'/>
</div>
</b:includable>
Step 2
- Now Find This Code
<b:include name='nextprev'/>
And Replace <b:include name='nextprev'/> code with code shown below.
<b:if cond='data:blog.pageType == "index"'>
<b:include name='page-navi'/>
<b:else/>
<b:if cond='data:blog.pageType == "archive"'>
<b:include name='page-navi'/>
</b:if>
<b:else/>
<b:if cond='data:blog.pageType == "item"'>
<b:include name='nextprev'/>
</b:if>
Step 3
- Now Find ]]></b:skin>
- Copy the below code and paste before the ]]></b:skin>
#blog-pager, .pagenavi {
clear: both;
text-align: center;
margin: 30px auto 10px;
}
#blog-pager a, .pagenavi span, .pagenavi a {
margin: 0 5px 0 0;
padding: 2px 10px 3px;
text-decoration: none;
color: #fff;
background: #2973FC;
-moz-border-radius: 2px;
-khtml-border-radius: 2px;
-webkit-border-radius: 2px;
border-radius: 2px;
-webkit-transition: all .3s ease-in;
-moz-transition: all .3s ease-in;
-o-transition: all .3s ease-in;
transition: all .3s ease-in;
}
#blog-pager a:visited, .pagenavi a:visited {
color: #fff;
}
#blog-pager a:hover, .pagenavi a:hover {
color: #fff;
text-decoration: none;
background: #000;
}
#blog-pager-older-link, #blog-pager-newer-link {
float: none;
}
.pagenavi .current {
color: #fff;
text-decoration: none;
background: #000;
}
.pagenavi .pages, .pagenavi .current {
font-weight: bold;
}
.pagenavi .pages {
color: #fff;
background: #2973FC;
}
Now Click Save Template and enjoy!!! I hope you will like this widget.
No comments:
Post a Comment